Artikel asal : https://www.mql5.com/en/articles/100
Introduction
This article is aimed at beginners who wish to learn how to write simple Expert Advisors in the new MQL5 language. We will begin first by defining what we want our EA (Expert advisor) to do, and then move on to how we want the EA to do it.
1. Trading Strategy
What our EA will do:
- It will monitor a particular indicator, and when a certain condition is met (or certain conditions are met), it will place a trade (either a Short/Sell or Long/Buy), depending on the present condition that has been met.
The above is called a trading strategy. Before you can write an EA, you must first develop the strategy that you want to automate into the EA. So in this case, let us modify the above statement so that it reflects the strategy we want to develop into an EA.
- We will use an indicator called Moving Average with a period of 8 ( You can choose any period, but for the purpose of our strategy, we will use 8)
- We want our EA to place a Long (Buy) trade when the Moving Average-8 (for the sake of our discussion, I will refer to it as MA-8) is increasing upwards and the price is close above it and it will place a Short (Sell) when MA-8 is decreasing downwards and the price is close below it.
- We are also going to use another indicator called Average Directional Movement (ADX) with period 8 also to help us determine whether the market is trending or not. We are doing this because we only want to enter the trade when the market is trending and relax when the market is ranging (that is, not trending). To achieve this, we will only place our trade (Buy or Sell) when above conditions are met and the ADX value is greater that 22. If ADX is greater that 22 but decreasing, or ADX is less than 22, we will not trade, even though the condition B has been met.
- We want to also protect ourselves by setting a Stop loss of 30 pips, and for our Profit target; we will target a profit of 100 pips.
- We also want our EA to look for Buy/Sell opportunities only when a new bar has been formed and we will also make sure we open a Buy position if the Buy conditions are met and we do not already have one opened, and open a Sell position when the Sell conditions are met and we do not already have one opened.
We have now developed our strategy; it is now time to start writing our code.
2. Writing an Expert Advisor
2.1 MQL5 Wizard
Begin by launching the MetaQuotes Language Editor 5. Then press Ctrl+N or click on the New button on the Menu bar

Figure 1. Starting a new MQL5 document
In the MQL5 Wizard window, select Expert Advisor and click the “Next” as shown on Fig. 2:

Figure 2. Selecting program type
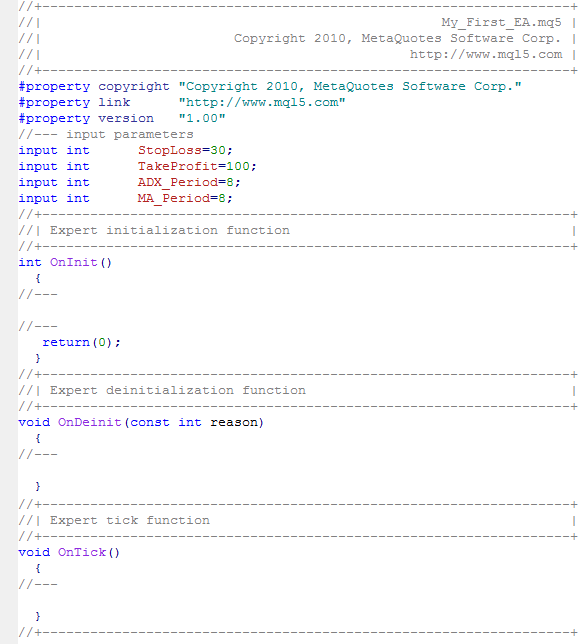
In the next window, type the Name you want to give to your EA in the Name box. In this case, I typed My_First_EA. You can then type your name in the Author box and also your website address or email address in the Link box (if you have one).

Figure 3. General properties of the Expert Advisor
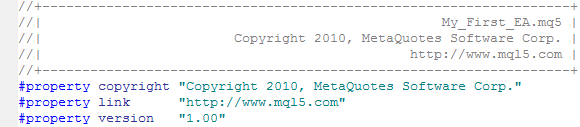
Since we want to be able to change some of the parameters for our EA in order to see which of the values can give us the best result, we shall add them by clicking the “Add” button.

Figure 4. Setting EA input parameters
In our EA, we want to be able to experiment with our Stop Loss, Take Profit, ADX Period, and Moving Average Period settings, so we will define them at this point.
Double Click under the Name section and type the name of the parameter, then double click under the Type to Select the data type for the parameter, and double click under the Initial value section and type the initial value for the parameter.
Once you are done, it should look something like this:

Figure 5. Data types of EA input parameters
As you can see above, I selected integer (int) data type for all the parameters. Let us talk a little about data types.
- char: The char type takes 1 byte of memory (8 bits) and allows expressing in the binary notation 2^8=256 values. The char type can contain both positive and negative values. The range of values is from -128 to 127.
- uchar : The uchar integer type also occupies 1 byte of memory, as well as the char type, but unlike it uchar is intended only for positive values. The minimum value is zero, the maximum value is 255. The first letter u in the name of the uchar type is the abbreviation for unsigned.
- short: The size of the short type is 2 bytes (16 bits) and, accordingly, it allows expressing the range of values equal to 2 to the power 16: 2^16 = 65 536. Since the short type is a sign one, and contains both positive and negative values, the range of values is between -32 768 and 32 767.
- ushort: The unsigned short type is the type ushort, which also has a size of 2 bytes. The minimum value is 0, the maximum value is 65 535.
- int : The size of the int type is 4 bytes (32 bits). The minimal value is -2 147 483 648, the maximal one is 2 147 483 647.
- uint : The unsigned integer type is uint. It takes 4 bytes of memory and allows expressing integers from 0 to 4 294 967 295.
- long : The size of the long type is 8 bytes (64 bits). The minimum value is -9 223 372 036 854 775 808, the maximum value is 9 223 372 036 854 775 807.
- ulong : The ulong type also occupies 8 bytes and can store values from 0 to 18 446 744 073 709 551 615.
From the above description of the various data types, the unsigned integer types are not designed for storing negative values, any attempt to set a negative value can lead to unexpected consequences. For example, if you want to store negative values, you cannot store them inside the unsigned types (i.e. uchar, uint, ushort, ulong).
Back to our EA. Looking at the data types, you will agree with me that we are suppose to use char or uchar data types since the data we intend to store in these parameters are less than 127 or 255 respectively. For good memory management, this is the best thing to do. However for the sake of our discussion, we will still stick to the int type.
Once you are done setting all the necessary parameters, click the Finished button and the MetaQuotes Editor will create the skeleton of the code for you as shown in the next figure.
Let’s break the code into the various sections for better understanding.
The top part (Header) of the code is where the property of the EA is defined. You can see that here are the values you filled in the MQL5 Wizard in figure 3.
In this section of the code, you can define additional parameters like description (brief text description of the EA), declare constants, include additional files or import functions.
When a statement begins with a # symbol, it is called a preprocessor directive and it does not end with a semicolon ‘;’ other example of preprocessor directives includes:
#define :
The #define directive is used for a declaration of constants. It is written in the form
#define identifier token_string
What this does is substitute every occurrence of identifier in your code with the value token_string.
Example :
#define ABC 100
#define COMPANY_NAME “MetaQuotes Software Corp.”
It will replace every occurrence of COMPANY_NAME with the string “MetaQuotes Software Corp.” or it will replace every occurrence of ABC with the char (or integer) 100 in your code.
You can read more about the preprocessor directives in the MQL5 Manual. Let us now continue with our discussion.
The second part of the header of our code is the input parameters section:
We specify all parameters, which will be used in our EA at this section. These include all variables that will be used by all the functions we will be writing in our EA.
Variables declared at this level are called Global Variables because they are accessible by every function in our EA that may need them. The input parameters are parameters that can only be changed outside of our EA. We can also declare other variables which we will manipulate in the course of our EA but will not be available outside of our EA in this section.
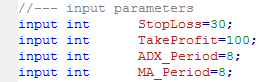
Next is the EA initialization function. This is the first function that is called when the EA is launched or attached to a chart and it is called only once.
This section is the best place to make some important checks in order to make sure our EA works very well.
We can decide to know if the chart has enough bars for our EA to work, etc.
It is also the best place to get the handles we will be using for our indicators (ADX and Moving Average indicators).
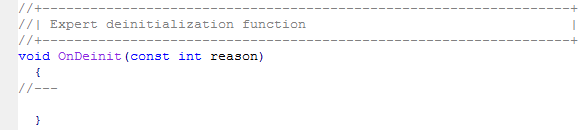
The OnDeinit function is called when the EA is removed from the chart.
For our EA, we will release the handles created for our Indicators during the initialization in this section.
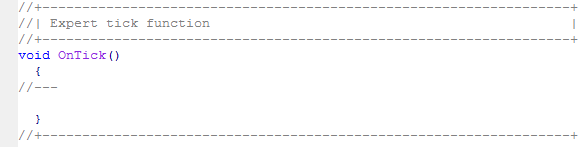
This function process the NewTick event, which is generated when a new quote is received for a symbol.
Note, that Expert Advisor cannot perform trade operations if the use of Expert Advisors in the client terminal is not allowed (Button “Auto Trading”).

Figure 6. Autotrading is enabled
Most of our codes that will implement our trading strategy, developed earlier, will be written within this section.
Now that we have looked at the various sections of the code for our EA, let us begin adding flesh to the skeleton.
2.2 INPUT PARAMETERS SECTION
//--- input parameters
input int      StopLoss=30;      // Stop Loss
input int      TakeProfit=100;   // Take Profit
input int      ADX_Period=8;     // ADX Period
input int      MA_Period=8;      // Moving Average Period
input int      EA_Magic=12345;   // EA Magic Number
input double   Adx_Min=22.0;     // Minimum ADX Value
input double   Lot=0.1;          // Lots to Trade
//--- Other parameters
int adxHandle; // handle for our ADX indicator
int maHandle;  // handle for our Moving Average indicator
double plsDI[],minDI[],adxVal[]; // Dynamic arrays to hold the values of +DI, -DI and ADX values for each bars
double maVal[]; // Dynamic array to hold the values of Moving Average for each bars
double p_close; // Variable to store the close value of a bar
int STP, TKP;   // To be used for Stop Loss & Take Profit values
As you can see, we have added more parameters. Before we continue discussing the new parameters, let us discuss something you can see now. The two forward slashes ‘//’ allows us to put comments in our codes. With comments, we are able to know what our variables stand for, or what we are doing at that point in time in our code. It also gives a better understanding of our code. There are two basic ways of writing comments:
// Other Parameters …
This is a single line comment
/*
This is a multi-line comment
*/
This is a multi-line comment. Multi-line comments start with the /* pair of symbols and end with the */ one.
The compiler ignores all comments when compiling your code.
Using single-line comments for the input parameters is a good way of making our EA users understand what those parameters stands for. On the EA Input properties, our users will not see the parameter itself, but instead they will see the comments as shown below:

Figure 7. Expert Advisor input parameters
Now, back to our code…
We have decided to add additional parameters for our EA. The EA_Magic is the magic number for all orders by our EA. The minimum ADX value (Adx_Min) is declared as a double data type. A double is used to store floating point constants, which contain an integer part, a decimal point, and a fraction part.
Example:
double mysum = 123.5678;
double b7 = 0.09876;
The Lot to trade (Lot) represents the volume of the financial instrument we want to trade. Then we declared other parameters that we will be using:
The adxHandle is to be used for storing the ADX indicator handle, while the maHandle will store the handle for the Moving Average indicator. The plsDI[], minDI[], adxVal[] are dynamic arrays that will hold the values of +DI, -DI and main ADX (of the ADX Indicator) for each bar on the chart. The maVal[] is a dynamic array that will hold the values of the Moving Average indicator for each bar on the chart.
By the way, what are dynamic arrays? A dynamic array is an array declared without a dimension. In other words, no value is specified in the pair of square brackets. A static array, on the other hand has its dimensions defined at the point of declaration.
Example:
double allbars[20]; // this will take 20 elements
p_close is a variable we will use to store the Close price for the bar we are going to monitor for checking of our Buy/Sell trades.
STP and TKP are going to be used to store the Stop Loss and the Take Profit values in our EA.
2.3. EA INTIALIZATION SECTION
int OnInit()
  {
//--- Get handle for ADX indicator
   adxHandle=iADX(NULL,0,ADX_Period);
//--- Get the handle for Moving Average indicator
   maHandle=iMA(_Symbol,_Period,MA_Period,0,MODE_EMA,PRICE_CLOSE);
//--- What if handle returns Invalid Handle
   if(adxHandle<0 || maHandle<0)
     {
      Alert("Error Creating Handles for indicators - error: ",GetLastError(),"!!");
     }
Here we obtain the handles of our indicator using the respective indicator functions.
The ADX indicator handle is obtained by using the iADX function. It takes the chart symbol (NULL also means the current symbol on the current chart), the chart period/timeframe (0 also means the current timeframe on the current chart), the ADX averaging period for calculating the index (which we defined earlier under input parameters section) as parameters or arguments.
int iADX(
string symbol, // symbol name
ENUM_TIMEFRAMES period, // period
int adx_period // averaging period
);
The Moving Average indicator handle is obtained by using the iMA function. It has the following arguments:
- the chart symbol (which can be obtained using _symbol, symbol() or NULL for the current symbol on the current chart),
- the chart period/timeframe (which can be obtained using _period, period(), or 0 for the current timeframe on the current chart),
- the Moving Average averaging period (which we defined earlier under input parameters section),
- the shift of the indicator relative to the price chart (shift here is 0),
- the Moving average smoothing type (could be any of following averaging methods: Simple Averaging-MODE_SMA, Exponential Averaging-MODE_EMA, Smoothed Averaging-MODE_SMMA or Linear-Weighted Averaging-MODE_LWMA), and
- the price used for the averaging (here we use the close price).
| int iMA( string symbol, // symbol name ENUM_TIMEFRAMES period, // period int ma_period, // averaging period int ma_shift, // horizontal shift ENUM_MA_METHOD ma_method, // smoothing type ENUM_APPLIED_PRICE applied_price // type of price or handle ); |
Please read the MQL5 manual to get more details about these indicator functions. It will give you a better understanding of how to use each indicator.
We again try to check for any error in case the function did not successfully return the handle, we will get an INVALID_HANDLE error. We use the alert function to display the error using the GetlastError function.
//--- Let us handle currency pairs with 5 or 3 digit prices instead of 4
   STP = StopLoss;
   TKP = TakeProfit;
   if(_Digits==5 || _Digits==3)
     {
      STP = STP*10;
      TKP = TKP*10;
     }
We decides to store the Stop Loss and the Take Profit values in the variables STP and TKP we declared earlier. Why are we doing this?
It’s because the values stored in the INPUT parameters are read-only, they cannot be modified. So here we want to make sure that our EA works very well with all brokers. Digits or Digits() returns the number of decimal digits determining the accuracy of price of the current chart symbol. For a 5-digit or 3-digit price chart, we multiply both the Stop Loss and the Take Profit by 10.
2.4. EA DEINTIALIZATION SECTION
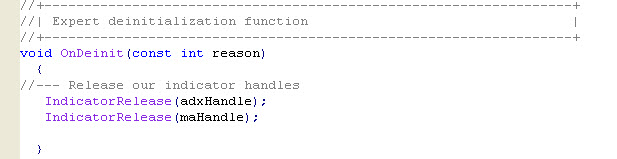
Since this function is called whenever the EA is disabled or removed from a chart, we will release all the indicators handles that were created during the initialization process here. We created two handles, one for ADX indicator and another handle for the Moving Average indicator.
We will use the IndicatorRelease() function to accomplish this. It takes only one argument (the indicator handle)
bool IndicatorRelease(
int indicator_handle, // indicator handle
);
The function removes an indicator handle and release the calculation block of the indicator, if it’s not been used.
2.5 THE EA ONTICK SECTION
The first thing we have to do here is to check if we have enough bars on the present chart. We can get the total bars in history of any chart using the Bars function. It takes two parameters, the symbol (can be obtained using _Symbol or Symbol(). These two return the current symbol for the current chart on which our EA is attached) and the period or timeframe of the present chart (can be obtained using Period or Period(). This two will return the timeframe of the current chart on which the EA is attached).
If the total available bars are less than 60, we want our EA to relax until we have enough bars available on the chart. The Alert function displays a message on a separate window. It takes any values separated by commas as parameters/arguments. In this case, we have only one string value. The return exits the initialization of our EA.
//+------------------------------------------------------------------+
//| Expert tick function                                             |
//+------------------------------------------------------------------+
void OnTick()
  {
// Do we have enough bars to work with
   if(Bars(_Symbol,_Period)<60) // if total bars is less than 60 bars
     {
      Alert("We have less than 60 bars, EA will now exit!!");
      return;
     }
// We will use the static Old_Time variable to serve the bar time.
// At each OnTick execution we will check the current bar time with the saved one.
// If the bar time isn't equal to the saved time, it indicates that we have a new tick.
   static datetime Old_Time;
   datetime New_Time[1];
   bool IsNewBar=false;

// copying the last bar time to the element New_Time[0]
   int copied=CopyTime(_Symbol,_Period,0,1,New_Time);
   if(copied>0) // ok, the data has been copied successfully
     {
      if(Old_Time!=New_Time[0]) // if old time isn't equal to new bar time
        {
         IsNewBar=true;   // if it isn't a first call, the new bar has appeared
         if(MQL5InfoInteger(MQL5_DEBUGGING)) Print("We have new bar here ",New_Time[0]," old time was ",Old_Time);
         Old_Time=New_Time[0];            // saving bar time
        }
     }
   else
     {
      Alert("Error in copying historical times data, error =",GetLastError());
      ResetLastError();
      return;
     }

//--- EA should only check for new trade if we have a new bar
   if(IsNewBar==false)
     {
      return;
     }

//--- Do we have enough bars to work with
   int Mybars=Bars(_Symbol,_Period);
   if(Mybars<60) // if total bars is less than 60 bars
     {
      Alert("We have less than 60 bars, EA will now exit!!");
      return;
     }

//--- Define some MQL5 Structures we will use for our trade
   MqlTick latest_price;     // To be used for getting recent/latest price quotes
   MqlTradeRequest mrequest;  // To be used for sending our trade requests
   MqlTradeResult mresult;    // To be used to get our trade results
   MqlRates mrate[];         // To be used to store the prices, volumes and spread of each bar
   ZeroMemory(mrequest);     // Initialization of mrequest structure
The Expert Advisor will perform trade operations at the beginning of a new bar, so it’s necessary to solve the problem with the new bar identification. In order words, we want to be sure that our EA does not check for Long/Short setups on every tick, we only want our EA to check for Long/Short positions when there is a new bar.
We begin by declaring a static datetime variable Old_Time, which will store the Bar time. We declared it as static because we want the value to be retained in memory until the next call of the OnTick function. Then we will be able to compare its value with the New_Time variable (also of datetime data type), which is an array of one element to hold the new(current) bar time. We also declared a bool data type variable IsNewBar and sets its value to false. This is because we want its value to be TRUE only when we have a new bar.
We use the CopyTime function to get the time of the current bar. It copies the bar time to the array New_Time with one element; if it is successful, we compare the time of a new bar with the previous bar time. If the times aren’t equal, it means that we have a new bar, and we set the variable IsNewBar to TRUE and save the value of the current bar time to the variable Old_Time.
The IsNewBar variable indicates that we have a new bar. If it’s FALSE, we finish the execution of OnTick function.
Take a look at the code
if(MQL5InfoInteger(MQL5_DEBUGGING)) Print("We have new bar here ",New_Time[0]," old time was ",Old_Time);
it checks for the debug mode execution, it will print the message about the bar times when debug mode, we will consider it further.
The next thing we want to do here is to check if we have enough bars to work with. Why repeat it? We just want to be sure that our EA works correctly. It should be noted that while the OnInit function is called only once when the EA is attached to a chart, the OnTick function is called every time there is a new tick (price quote).
You observe that we have done it again differently here. We decide to store the total bars in history which we obtained from the expression
int Mybars=Bars(_Symbol,_Period);
in a new variable, Mybars, declared within the OnTick function. This type of variable is a local variable, unlike the variable we declared at the INPUT PARAMETERS section of our code. While the variables, declared at the Input Parameters section of our code, are available to all functions, within our code that may need them, variables declared within a single function is limited and available to that function alone. It can not be used outside of that function.
Next, we declared a few variables of MQL5 structure types which will be used in this section of our EA. MQL5 has quite a number of built in Structures which makes things pretty easy for EA developers. Let’s take the Structures one after the other.
This is a structure used for storing the latest prices of symbols.
struct MqlTick
{
datetime time; // Time of the last prices update
double bid; // Current Bid price
double ask; // Current Ask price
double last; // Price of the last deal (Last)
ulong volume; // Volume for the current Last price
};
Any variable declared to be of the MqlTick type can easily be used to obtain the current values of Ask, Bid, Last and Volume once you call the SymbolInfoTick() function.
So we declared latest_price as a MqlTick type so that we could use it to get the Ask and Bid prices
This structure is used to perform all trade requests for a trade operation. It contains, in its structure, all the fields necessary for performing a trade deal.
struct MqlTradeRequest
{
ENUM_TRADE_REQUEST_ACTIONS action; // Trade operation type
ulong magic; // Expert Advisor ID (magic number)
ulong order; // Order ticket
string symbol; // Trade symbol
double volume; // Requested volume for a deal in lots
double price; // Price
double stoplimit; // StopLimit level of the order
double sl; // Stop Loss level of the order
double tp; // Take Profit level of the order
ulong deviation; // Maximal possible deviation from the requested price
ENUM_ORDER_TYPE type; // Order type
ENUM_ORDER_TYPE_FILLING type_filling; // Order execution type
ENUM_ORDER_TYPE_TIME type_time; // Order execution time
datetime expiration; // Order expiration time (for the orders of ORDER_TIME_SPECIFIED type)
string comment; // Order comment
};
Any variable declared to be of the MqlTradeRequest type can be used to send orders for our trade operations. Here we declared mrequest as a MqlTradeRequest type.
The result of any trade operation is returned as a special predefined structure of MqlTradeResult type. Any variable declared to be of MqlTradeResult type will be able to access the trade request results.
struct MqlTradeResult
{
uint retcode; // Operation return code
ulong deal; // Deal ticket, if it is performed
ulong order; // Order ticket, if it is placed
double volume; // Deal volume, confirmed by broker
double price; // Deal price, confirmed by broker
double bid; // Current Bid price
double ask; // Current Ask price
string comment; // Broker comment to operation (by default it is filled by the operation description)
};
Here we declared mresult as a MqlTradeResult type.
The Price (Open, Close, High, Low), the Time, the Volumes of each bar and the spread for a symbol is stored in this structure. Any array declared to be of the MqlRates type can be used to store the price, volumes and spread history for a symbol.
struct MqlRates
{
datetime time; // Period start time
double open; // Open price
double high; // The highest price of the period
double low; // The lowest price of the period
double close; // Close price
long tick_volume; // Tick volume
int spread; // Spread
long real_volume; // Trade volume
};
Here we have declared an array mrate[] which will be used to store these information.
/*
     Let's make sure our arrays values for the Rates, ADX Values and MA values
     is store serially similar to the timeseries array
*/
// the rates arrays
   ArraySetAsSeries(mrate,true);
// the ADX DI+values array
   ArraySetAsSeries(plsDI,true);
// the ADX DI-values array
   ArraySetAsSeries(minDI,true);
// the ADX values arrays
   ArraySetAsSeries(adxVal,true);
// the MA-8 values arrays
   ArraySetAsSeries(maVal,true);
Next we decide to set all the arrays we will be using to store Bars details as series. This is to ensure that the values that will be copied to the arrays will be indexed like the timeseries, that is, 0, 1, 2, 3, (to correspond with the bars index. So we use the ArraySetAsSeries() function.
bool ArraySetAsSeries(
void array[], // array by reference
bool set // true denotes reverse order of indexing
);
It should be noted that this can also be done once at the initialization section of our code. However, I have decided to show it at this point for the sake of our explanation.
//--- Get the last price quote using the MQL5 MqlTick Structure
   if(!SymbolInfoTick(_Symbol,latest_price))
     {
      Alert("Error getting the latest price quote - error:",GetLastError(),"!!");
      return;
     }
We now use the SymbolInfoTick function to obtain the latest price quote. This function takes two arguments – chart symbol and the MqlTick structure variable (latest_price). Again, if there is error, we reported it.
//--- Get the details of the latest 3 bars
   if(CopyRates(_Symbol,_Period,0,3,mrate)<0)
     {
      Alert("Error copying rates/history data - error:",GetLastError(),"!!");
      return;
     }
Next we copied the information about the latest three bars into our Mqlrates type array using the CopyRates function. The CopyRates function is used to get history data of MqlRates structure of a specified Symbol-Period in specified quantity into a MqlRates type array.
int CopyRates(
string symbol_name, // symbol name
ENUM_TIMEFRAMES timeframe, // period
int start_pos, // start position
int count, // data count to copy
MqlRates rates_array[] // target array to copy
);
The symbol name is obtained by using ‘_symbol’, the current period/timeframe is obtained by using ‘_period’. For the start position, we will start from the current bar, Bar 0 and we will count only three Bars, Bars 0, 1, and 2. The result will be store in our array, mrate[].
The mrate[] array now contains all the price, time, volumes and spread information for bars 0 , 1 and 2. Therefore to get the details of any bar, we will use the following:
mrate[bar_number].bar_property
for example, we can have the following information about each bar:
mrate[1].time // Bar 1 Start time
mrate[1].open // Bar 1 Open price
mrate[0].high // Bar 0 (current bar) high price, etc
Next we, copied all the indicator values into the dynamic arrays we have declared using the CopyBuffer function.
int CopyBuffer(
int indicator_handle, // indicator handle
int buffer_num, // indicator buffer number
int start_pos, // start position
int count, // amount to copy
double buffer[] // target array to copy
);
The indicator handle is the handle we created in the OnInit section. Concerning buffer numbers, the ADX indicator has three (3) buffers:
- 0 – MAIN_LINE,
- 1 – PLUSDI_LINE,
- 2 – MINUSDI_LINE.
The Moving Average indicator has only one (1) buffer:
- 0 – MAIN_LINE.
We copy from the present bar (0) to the past two bars. So amount of records to copy is 3 (bars 0, 1 and 2). The buffer[] is the target dynamic arrays we had earlier declared – adxVal, plsDI, minDI and maVal.
As you can see here again, we try to capture any error that may occur in the copying process. If there is error, no need to go further.
It is important to note that the CopyBuffer() and the CopyRates() function returns the total number of records copied on success while it returns -1 incase of an error. That is why we are checking for a value less than 0 (zero) in the error checking functions here.
//--- Copy the new values of our indicators to buffers (arrays) using the handle
   if(CopyBuffer(adxHandle,0,0,3,adxVal)<0 || CopyBuffer(adxHandle,1,0,3,plsDI)<0
      || CopyBuffer(adxHandle,2,0,3,minDI)<0)
     {
      Alert("Error copying ADX indicator Buffers - error:",GetLastError(),"!!");
      return;
     }
   if(CopyBuffer(maHandle,0,0,3,maVal)<0)
     {
      Alert("Error copying Moving Average indicator buffer - error:",GetLastError());
      return;
     }
At this point we want to check if we already have a Buy or Sell position opened, in order words, we want to make sure we have only ONE Sell or Buy trade opened at a time. We do not want to open a new Buy if we already have one, and we do not want to open a new Sell if we already have one opened.
To achieve we will first of all declare two bool data type variables (Buy_opened and Sell_opened) which will hold a TRUE value if we already have a position opened for either Buy or Sell.
//--- we have no errors, so continue
//--- Do we have positions opened already?
    bool Buy_opened=false;  // variable to hold the result of Buy opened position
    bool Sell_opened=false; // variable to hold the result of Sell opened position

    if (PositionSelect(_Symbol) ==true)  // we have an opened position
    {
         if (PositionGetInteger(POSITION_TYPE) == POSITION_TYPE_BUY)
         {
            Buy_opened = true;  //It is a Buy
         }
         else if(PositionGetInteger(POSITION_TYPE) == POSITION_TYPE_SELL)
         {
            Sell_opened = true; // It is a Sell
         }
    }
We use the trade function PositionSelect to know if we have an open position. This function returns TRUE if we have a position opened already and FALSE if we have none.
bool  PositionSelect(
   string  symbol      // Symbol name
 );
It takes, as the major argument/parameter, the symbol (currency pair) we want to check. Here, we use _symbol because we are checking the current symbol(currency-pair).
If this expression returns TRUE, then we want to check if the position opened is a Buy or a Sell. We use the PositionGetInteger function for this. it gives us the type of position opened when we use it with the POSITION_TYPE modifier. It returns the Position type identifier which can either be POSITION_TYPE_BUY or POSITION_TYPE_SELL
long  PositionGetInteger(
   ENUM_POSITION_PROPERTY  property_id      // Property identifier
   );
In our case, we used it to determine which of the position we already have opened. If it is a Sell, we store a TRUE value in Sell_opened and if it is a Buy, we store a TRUE value in Buy_opened. We will be able to use these two variables later when we are checking for Sell or Buy conditions later in our code.
It is now time to store the close price for the bar we will be using for our Buy/Sell setup. Remember we declared a variable for that earlier
// Copy the bar close price for the previous bar prior to the current bar, that is Bar 1

   p_close=mrate[1].close;  // bar 1 close price
Having done this, we will now proceed to the next step.
/*
    1. Check for a long/Buy Setup : MA-8 increasing upwards,
    previous price close above it, ADX > 22, +DI > -DI
*/
//--- Declare bool type variables to hold our Buy Conditions
   bool Buy_Condition_1 = (maVal[0]>maVal[1]) && (maVal[1]>maVal[2]); // MA-8 Increasing upwards
   bool Buy_Condition_2 = (p_close > maVal[1]);         // previuos price closed above MA-8
   bool Buy_Condition_3 = (adxVal[0]>Adx_Min);          // Current ADX value greater than minimum value (22)
   bool Buy_Condition_4 = (plsDI[0]>minDI[0]);          // +DI greater than -DI

//--- Putting all together
   if(Buy_Condition_1 && Buy_Condition_2)
     {
      if(Buy_Condition_3 && Buy_Condition_4)
        {
         // any opened Buy position?
         if (Buy_opened)
         {
            Alert("We already have a Buy Position!!!");
            return;    // Don't open a new Buy Position
         }
         mrequest.action = TRADE_ACTION_DEAL;                                // immediate order execution
         mrequest.price = NormalizeDouble(latest_price.ask,_Digits);          // latest ask price
         mrequest.sl = NormalizeDouble(latest_price.ask - STP*_Point,_Digits); // Stop Loss
         mrequest.tp = NormalizeDouble(latest_price.ask + TKP*_Point,_Digits); // Take Profit
         mrequest.symbol = _Symbol;                                         // currency pair
         mrequest.volume = Lot;                                            // number of lots to trade
         mrequest.magic = EA_Magic;                                        // Order Magic Number
         mrequest.type = ORDER_TYPE_BUY;                                     // Buy Order
         mrequest.type_filling = ORDER_FILLING_FOK;                          // Order execution type
         mrequest.deviation=100;                                            // Deviation from current price
         //--- send order
         OrderSend(mrequest,mresult);
It is now time to start checking for a Buy opportunity.
Let us analyze the expression above as it represents the strategy we designed earlier. We are declaring a bool type variable for each of our conditions that must be met before an order can be placed. A bool type variable can only contain TRUE or FALSE. So, our Buy strategy has been broken down into four conditions. If any of the conditions is met or satisfied, then a value of TRUE is stored in our bool type variable, otherwise, a value of FALSE will be stored. Let us look at them one by one.
bool Buy_Condition_1 = (maVal[0]>maVal[1]) && (maVal[1]>maVal[2]);
Here we are looking at the MA-8 values on Bars 0, 1 and 2. If value of MA-8 on the current bar is greater than its value on the previous Bar 1 and also the MA-8 value on Bar 1 is greater than its value on Bar 2, it means that MA-8 is increasing upwards. This satisfies one of our conditions for a Buy setup.
bool Buy_Condition_2 = (p_close > maVal[1]);
This expression is checking to see if Bar 1 Close price is higher than the value of MA-8 at the same period (Bar 1 period). If the price is higher, then our second condition has also been satisfied, then we can check for other conditions. However, if the two conditions we have just considered were not met, then there will be no need to check other conditions. That is why we decide to include the next expressions within these two initial conditions (expressions).
bool Buy_Condition_3 = (adxVal[0]>Adx_Min);
Now we want to check if the current value of ADX (ADX value on Bar 0) is greater than the Minimum ADX value declared in the input parameters. If this expression is true, that is, the current value of ADX is greater than the Minimum required value; we also want to be sure that the plusDI value is greater than the minusDI value. This is what we achieved in the next expression
bool Buy_Condition_4 = (plsDI[0]>minDI[0]);
If all these conditions are met, that is, if they return true, then we want to be sure that we do not open a new Buy position if we already have one. It is now time to check the value of the Buy_opened variable we declared earlier in our code.
// any opened Buy position?
if (Buy_opened)
   {
      Alert("We already have a Buy Position!!!");
      return;    // Don't open a new Buy Position
   }
If Buy_opened is true, we do not want to open another Buy position, so, we display an alert to inform us and then return so that our EA will now wait for the next Tick. However, if Buy_opened is FALSE, then we prepare our records using the MqlTradeRequest type variable (mrequest) which we declared earlier to send our order.
- The action here, which is the trade operation type, is TRADE_ACTION_DEAL because we are placing a trade order for an immediate execution. If we are modifying an order, then we will use TRADE_ACTION_MODIFY. To delete an order we will use TRADE_ACTION_REMOVE. We used our MqlTick type latest_price to get the latest Ask price. The order Stop loss price is obtained by subtracting our StopLoss in points from the Ask price while the order take profit price is obtained by adding our TakeProfit in points to the Ask price. You will also observe that we used the NormalizeDouble function for the Ask price, the StopLoss and TakeProfit values, it is good practice to always normalize these prices to the number of digits of currency pair before sending it to the trade server.
- The symbol is the current symbol (_Symbol or Symbol()). The order type is the type of order we are placing, here we are placing a buy order ORDER_TYPE_BUY. For a Sell order, it will be ORDER_TYPE_SELL.
- The order type_filling is the order execution type; ORDER_FILLING_FOK means that the deal can be executed exclusively with a specified volume at the equal or better price than the order specified price. If there is no sufficient volume of offers on the order symbol, the order will not be executed.
The OrderSend() function takes two arguments, the MqlTradeRequest type variable and the MqlTradeResult type variable.
bool  OrderSend(
   MqlTradeRequest&  request      // query structure
   MqlTradeResult&   result       // structure of the answer
   );
As you can see, we used our MqlTradeRequest type variable and the MqlTradeResult type variable in placing our order using OrderSend.
         // get the result code
         if(mresult.retcode==10009 || mresult.retcode==10008) //Request is completed or order placed
           {
            Alert("A Buy order has been successfully placed with Ticket#:",mresult.order,"!!");
           }
         else
           {
            Alert("The Buy order request could not be completed -error:",GetLastError());
            ResetLastError();
            return;
           }
Having sent our order, we will now use the MqlTradeResult type variable to check the result of our order. If our order is executed successfully, we want to be informed, and if not, we want to know too. With the MqlTradeResult type variable ‘mresult’ we can access the Operation return code and also the order ticket number if the order is placed.
The return code 10009 shows that the OrderSend request was completed successfully, while 10008 shows that our order has been placed. That is why we have checked for any of these two return codes. If we have any of them, we are sure that our order has been completed or it has been placed.
To check for a Sell Opportunity, we check for the opposite of what we did for Buy Opportunity except for our ADX that must be greater than the Minimum value specified.
/*
    2. Check for a Short/Sell Setup : MA-8 decreasing downwards,
    previous price close below it, ADX > 22, -DI > +DI
*/
//--- Declare bool type variables to hold our Sell Conditions
   bool Sell_Condition_1 = (maVal[0]<maVal[1]) && (maVal[1]<maVal[2]);  // MA-8 decreasing downwards
   bool Sell_Condition_2 = (p_close <maVal[1]);                         // Previous price closed below MA-8
   bool Sell_Condition_3 = (adxVal[0]>Adx_Min);                         // Current ADX value greater than minimum (22)
   bool Sell_Condition_4 = (plsDI[0]<minDI[0]);                         // -DI greater than +DI

 //--- Putting all together
   if(Sell_Condition_1 && Sell_Condition_2)
       {
         if(Sell_Condition_3 && Sell_Condition_4)
           {
            // any opened Sell position?
            if (Sell_opened)
            {
                Alert("We already have a Sell position!!!");
                return;    // Don't open a new Sell Position
            }
            mrequest.action = TRADE_ACTION_DEAL;                                 // immediate order execution
            mrequest.price = NormalizeDouble(latest_price.bid,_Digits);          // latest Bid price
            mrequest.sl = NormalizeDouble(latest_price.bid + STP*_Point,_Digits); // Stop Loss
            mrequest.tp = NormalizeDouble(latest_price.bid - TKP*_Point,_Digits); // Take Profit
            mrequest.symbol = _Symbol;                                         // currency pair
            mrequest.volume = Lot;                                            // number of lots to trade
            mrequest.magic = EA_Magic;                                        // Order Magic Number
            mrequest.type= ORDER_TYPE_SELL;                                     // Sell Order
            mrequest.type_filling = ORDER_FILLING_FOK;                          // Order execution type
            mrequest.deviation=100;                                           // Deviation from current price
            //--- send order
            OrderSend(mrequest,mresult);
Just as we did in the buy section, we are declaring a bool type variable for each of our conditions that must be met before an order can be placed. A bool type variable can only contain TRUE or FALSE. So, our Sell strategy has been broken down into four conditions. If any of the conditions is met or satisfied, then a value of TRUE is stored in our bool type variable, otherwise, a value of FALSE will be stored. Let us look at them one by one as we did for the Buy section
bool Sell_Condition_1 = (maVal[0]<maVal[1]) && (maVal[1]<maVal[2]);
Here we are looking at the MA-8 values on Bars 0, 1 and 2. If value of MA-8 on the current bar is less than its value on the previous Bar 1 and also the MA-8 value on Bar 1 is less than its value on Bar 2, it means that MA-8 is decreasing downwards. This satisfies one of our conditions for a Sell setup.
bool Sell_Condition_2 = (p_close <maVal[1]);
This expression is checking to see if Bar 1 Close price is lower than the value of MA-8 at the same period (Bar 1 period). If the price is lower, then our second condition has also been satisfied, then we can check for other conditions. However, if the two conditions we have just considered were not met, then there will be no need to check other conditions. That is why we decide to include the next expressions within these two initial conditions (expressions).
bool Sell_Condition_3 = (adxVal[0]>Adx_Min);
Now we want to check if the current value of ADX (ADX value on Bar 0) is greater than the Minimum ADX value declared in the input parameters. If this expression is true, that is, the current value of ADX is greater than the Minimum required value; we also want to be sure that the MinusDI value is greater than the plusDI value. This is what we achieved in the next expression
bool Sell_Condition_4 = (plsDI[0]<minDI[0]);
If these conditions are met, that is, if they return true, then we want to be sure that we do not open a new Buy position if we already have one. It is now time to check the value of the Buy_opened variable we declared earlier in our code.
// any opened Sell position?
            if (Sell_opened)
            {
                Alert("We already have a Sell position!!!");
                return;    // Don't open a new Sell Position
            }
If Sell_opened is true, we do not want to open another Sell position, so, we display an alert to inform us and then return so that our EA will now wait for the next Tick. However, if Sell_opened is FALSE, then we setup our Sell trade request as we did for Buying order.
The major difference here is the way we calculated our stop loss price and take profit price. Also since we are selling, we sell at the Bid price; that is why we used our MqlTick type variable latest_price to get the latest bid price. The other type here, as explained earlier, is ORDER_TYPE_SELL.
Also here, we used the NormalizeDouble function for the Bid price, the StopLoss and TakeProfit values, it is good practice to always normalize these prices to the number of digits of currency pair before sending it to the trade server.
Just as we did for our Buy order, we must also check if our Sell order is successful or not. So we used the same expression as in our Buy order.
         if(mresult.retcode==10009 || mresult.retcode==10008) //Request is completed or order placed
           {
            Alert("A Sell order has been successfully placed with Ticket#:",mresult.order,"!!");
           }
         else
           {
            Alert("The Sell order request could not be completed -error:",GetLastError());
            ResetLastError();
            return;
           }
        }
3. Debugging and Testing our Expert Advisor
At this point, we need to test our EA to know it our strategy works or not. Also, it is possible that there are one or two errors in our EA code. This will be discovered in the next step.
3.1 DEBUGGING
Debugging our code helps us to see how our code performs line by line (if we set breakpoints) and there and then we can notice any error or bug in our code and quickly make the necessary corrections before using our code in real trade.
Here, we are going to go through the step by step process of debugging our Expert Advisor, first of all, by setting breakpoints and secondly, without breakpoints. To do this, Make sure you have not closed the Editor. First of all, let us select the chart we want to use to test our EA. On the Editor Menu bar, click on Tools and click on Options as shown below:

Figure 8. Setting Debugging options
Once the Options window appears, select the currency pair, and the period/timeframe to use and click the OK button:

Before we start the debugger, let us set breakpoints. Breakpoints allow us to monitor the behavior/performance of our code at certain selected locations or lines. Rather than running through all the code at once, the debugger will stop whenever it see a breakpoint, waiting for your net action. By this we will be able to analyze our code and monitor its behavior as it reaches every set break-points. We will also be able to evaluate the values of some of our variables to see if things are actually the way we envisaged.
To insert a breakpoint, go to the line in your code where you want to set the breakpoint. By the left hand side, on the gray field near the border of the code line, double-click and you will see a small round blue button with a white square inside it. Or on the alternative, place the cursor of your mouse anywhere on the code line where you want the breakpoint to appear and press F9. To remove the breakpoint, press F9 again or double-click on it.

Figure 10. Setting a breakpoint
For our code, we are going to set breakpoint on five different lines.
I will also label them form 1 to 5 for the sake of explanation.
To continue, set breakpoint at the seven code lines as shown in the figure below. Breakpoint 1 is the one we have created above.

Figure 11. Setting additional breakpoints
Once we have finished setting our breakpoints, we are now set to start debugging our code.
To start the debugger, press F5 or click the green button on the Toolbar of the MetaEditor:

Figure 12. Starting the Debugger
The first thing the editor does is to compile the code, if there is any error at the point, it will display it and if no error, it will let you know that the code compiled successfully.

Figure 13. Compilation Report
Please note that the fact that the code compiled successfully does not mean there may not be errors in your code. Depending on how your code is written, there may be runtime errors. For example, if any of our expressions does not evaluate correctly due to any little oversight, the code will compile correctly but may not run correctly. Too much of the talk, let’s see it in action…
Once the debugger has finished compiling the code, it takes you to the trading terminal, and attach the EA to the chart you have specified on the MetaEditor Options settings. At the same time, it shows you the Input parameters section of the EA. Since we are not adjusting anything yet, just click the OK button.

Figure 14. Expert Advisor Input Parameters for Debugging
You will now see the EA clearly on the top-right hand corner of the chart.
Once it starts the OnTick(), it will stop as soon as it gets to our breakpoint 1.

Figure 15. Debugger stops at the first breakpoint
You will notice a green arrow at that code line. That tells you that previous code line had been executed; we are now ready to execute the present line.
Let me make some explanations before we proceed. If you look at the Editor’s Tool Bar, you will observe that the three buttons with curved arrows which were earlier grayed out are now activated. This is because we are now running the debugger. These buttons/commands are used to step through our code (Step into, Step over or Step out)

Figure 16. Step into command
The Step Into is used to go from one step of the program execution into the next step, entering into any called functions within that code line. Click on the button or press F11 to invoke the command. (We will use this command in our Step-by-Step debugging of our code.)

Figure 17. Step over command
The Step over, on the other hand does not enter into any called function within that code line. Click on the button or press F10 to invoke the command

Figure 18. Step out command
To execute a program step that is one level higher, you click this button or press Shift+F11.
Also, at the lower part of the Editor, you will see the Toolbox window. The Debug tab in this window has the following headings:
- File : This displays the name of the file been called
- Function : This displays the present function from the file been called
- Line : This displays the number of the code line in the file from which the function is called.
- Expression : This is where you can type the name of any expression/variable you are interested in monitoring from our code.
- Value : This will display the value of the expression/variable we typed at the Expression area.
- Type : This will display the data type of the expression/variable been monitored.
Back to our debugging process…
The next thing we want to do is now to type in the variables/expressions from our code that we are interested in monitoring. Make sure you only monitor the variables/expressions that really matters in your code. For our example, we will monitor the following:
- Old_Time (old bar time)
- New_Time[0] (current bar time)
- IsNewBar (flag that indicates the new bar)
- Mybars (Total bars in History) – Our EA depends on it
You can add other ones like the ADX values, the MA-8 values, etc.
To add the expression/variable, double-click under the Expressions area or right-click under the Expressions area and select Add as shown in the figure above.
Type the expression/variable to monitor or watch.

Figure 19. The expressions watching window
Type all the necessary variables/expressions…

Figure 20. Adding expressions or variables to watch
If the variable hasn’t been declared yet, its type is “Unknown identifier” (except the static variables).
Now, lets move on…

Figure 21. Step into command in action
Click the Step into button or press F11 and observe what happens. Keep on pressing this button or F11 until you get to breakpoint no 2, continue until you get to breakpoint no 4 as shown below and observe the expressions watching window.

Figure 22. Watching the expressions or variables

Figure 23. Watching the expressions or variables

Figure 24. Watching the expressions or variables
Once there is a new tick, it will return to the fist code line of the OnTick() function. And all the values of our variables/expression will now be reset because this is a new tick except if any of them is declared as a static variable. In our case we have one static variable Old_Time.

Figure 25. Values of variables on NewTick event
To go over the process again, continue pressing the F11 key and keep monitoring the variables at the expressions watching window. You can stop the debugger and then remove all the breakpoints.
As we see, in Debug mode it prints the message “We have new bar here…”.

Figure 26. Expert Advisor prints the message in Debug mode
Start the debugging process again; but this time without breakpoints. Keep watching at every tick and if any of our Buy/Sell condition is met, it will place a trade and since we have written our code to tell us if an order is placed successful or otherwise, we will see an alert.

Figure 27. Expert Advisor places trade during debugging
I think you can leave the EA to work for a few more minutes while you take a coffee. Once you are back and you have made some money (just kidding), then click the STOP (Red) button on the MetaEditor to stop debugging.

Figure 28. Stopping the debugger
What we have actually done here is to see that our EA only checks for a trade at the opening of a new Bar and that our EA actually works. There is still a lot of room for adjustments to our EA code.
Let me make it clear, at this point that, the Trading terminal must be connected to the internet, otherwise, debugging will not work because the terminal will not be able to trade.
3.2 TESTING OUR EA STRATEGY
At this point we now want to test our EA using the Strategy Tester built into the Trading Terminal. To start the Strategy Tester, press CONTROL+R or click the View menu on the Terminal Menu Bar and click on Strategy Tester as shown below

Figure 26. Starting the Strategy Testing
The Tester (Strategy Tester) is shown at the lower part of the terminal. For you to see all the Tester’s settings, you need to expand/resize it. To do this, move your mouse pointer to the point shown by the red arrow (as shown below)

Figure 27. The Strategy Tester window
The mouse pointer changes to a double-end arrow, hold down the mouse and drag the line upwards. Stop when you discover that you can see everything on the settings tab.

Figure 28. The Strategy Tester Settings Tab
- Select the EA you want to test
- Select the Currency pair to use for the test
- Select the Period/Timeframe to use for the test
- Select Custom Period and set the dates in 5
- Set the dates for the custom period to be used for the test
- Execution is Normal
- Select the deposit amount in USD to be used for the test
- Set Optimization to Disable (We are not optimizing now, we just want to test)
- Click this button when you are ready to start test.
Before we click the Start button, lets look at the other tabs on the Tester
Agents Tab
The processor used by the Tester for the Test. Depending on your Computer’s processor type. Mine is only one (1) core processor.

Figure 29. The Strategy Tester Agents tab
Once the agent, you will see something similar to the figure below

Figure 30. The Strategy Tester Agents tab during a test
Journal Tab
This is where all the events going on during the test period is displayed

Figure 31. The Strategy Tester Journal tab showing trade activities
Inputs Tab
This is where you can specify the input parameters for the EA.

Figure 32. The Strategy Tester Inputs tab
If we are optimizing our EA, then we will need to set the values in the circled area.
- The Start is the values you want the Tester to begin with.
- The Step is the increment rate for the value you selected, and
- The Stop is the value at which the Tester will stop incrementing the value for that parameter.
However, in our case we are not optimizing our EA, so we will not need to touch that for now.
Once everything is set, we now go back to the Settings tab and click the Start button. Then the tester begins its work. All you need to do now is to go and take another cup of coffee if you like, or, if you are like me, you may want to monitor every event, then turn to the Journal tab.
Graph tab
Once you begin to see messages about orders been sent on the Journal Tab, you may then wish to turn to a NEW tab named Graph which has just been created. Once you switch to the Graph tab, you will see the graph keep on increasing or decreasing as the case may be depending on the outcome of your trades.

Figure 33. The graph result for the Expert Advisor Test
Results tab
Once the test is completed, you will see another tab called Results. Switch to the Results tab and you will see the summary of the test we have just carried out.

Figure 34. The Strategy Tester Results tab showing test results summary
You can see the total Gross Profit, Net Profit, total trades total loss trades and many more. Its really interesting to see that we have about USD 1,450.0 within the period we selected for our test. At least we have some profit.
Let me make something very clear to you here. You will discover that the settings for the EA parameters that you see in the Strategy tester is different from the initial settings in the Input parameters of the EA. I have just demonstrated to you that you can change any of those input parameters to get the best out of your EA. Instead of using a period of 8 each for the Moving Average and ADX, I changed it to 10 for Moving Average and 14 for ADX. I also change the Stop Loss from 30 to 35. Last but not the least, I decided to use 2 Hour timeframe. Remember, this is the Strategy Tester.
If you want to view a complete report of the test, then right-click on anywhere in the Results tab, you will see a menu. From this menu, Select ‘Save as Report’.

Figure 35. Saving the result of the test
The save dialog window will appear, type a name for your report (if you want, otherwise leave the default name) and click the save button. The whole report will be saved in HTML format for you.
To view the chart for the test that was carried out, click Open Chart and you will see the chart displayed

Figure 36. The chart showing the test
That’s it, we have successfully written and tested our EA and we now have a result to work with. You can now go back to the strategy tester Settings tab and make the test for other Timeframes/Period.
Assignment
I want you to carry out the test using different currency pairs, different timeframes, different Stop Loss, different Take profit and see how the EA performs. You can even try new Moving Average and ADX values. As I said earlier, that is the essence of the Strategy tester. I will also like you to share your results with me.
Conclusion
In this step by step guide, we have been able to look at the basic steps required in writing a simple Expert Advisor based on a developed trading strategy. We have also looked at how we check our EA for errors using the debugger. We also discussed how to test the performance of our EA using the Strategy Tester. With this, we have been able to see the power and robustness of the new MQL5 language. Our EA is not yet perfect or complete as many more adjustments must still be made in order to used it for real trading.
There is still more to learn and I want you to read the article over again together with the MQL5 manual, and try everything you have learn in this article, I can assure you that you will be a great EA developer in no distant future.
Happy coding.
how effective this ways?
Finally someone that knows what they’re talking about.
Hey there Please let me know where you got your theme. grazie
Good read, enjoyed it!
Step-By-Step Guide to writing an Expert Advisor in MQL5 for Beginners – FOREX
tvrzmenym http://www.gcs677smgqk267e74t398hnf8gy5q314s.org/
atvrzmenym
[url=http://www.gcs677smgqk267e74t398hnf8gy5q314s.org/]utvrzmenym[/url]
Step-By-Step Guide to writing an Expert Advisor in MQL5 for Beginners – FOREX
avyhslwxlmq
[url=http://www.g433iik6w15wgp658i38li51k5tqh20ys.org/]uvyhslwxlmq[/url]
vyhslwxlmq http://www.g433iik6w15wgp658i38li51k5tqh20ys.org/
Anyone else having issues viewing this on mobile device?